Showing posts with label geek crafts. Show all posts

Thursday, November 21, 2013

Make your own TARDIS #savetheday


If you are planning a big shin-dig for the Day of the Doctor, then you festivities will not be complete unless you have a TARDIS. This is after all the Doctor's preferred method of transport! Here is how you can put together a simple TARDIS that won't break the bank.

Materials & Tools 


  • 2 PVC pipe measuring 6ft
  • 1 PVC pipe measuring 38 inches
  • 4 PVC pipe measuring 12 inches
  • 4 PVC caps 
  • 2 PVC shaped t-shaped connectors 
  • 2 PVC curves 
  • Blue butcher paper (or blue table cloth) 
  • Black and white paper
  • Computer & printer 
  • Tape 

Instructions


  • Gather all of your pvc supplies and begin assembling them. Refer to the pictures! I will describe as best I can but I think the pictures will help you the most! 
  • Bottom pieces: 
    • Take 2 of the 12 inch pvc pipes and t-shaped connector. Place each of the 12 inch pvc pieces on each end of the connector. 
    • Repeat this step so you have two! 
  • Take the two 6 feel pvc pipes and insert them into the t-shaped connector of your bottom pieces
  • Next take the 38 inche pvc pipe and place a corner connection on each end. Then attach it to the top of your already assembled structure.
  • Your almost there! Keep it laying down flat and wrap it with paper. If you don't have paper that is big enough you can use a blue vinyl table cloth (they are in the party section of most stores) 
  • swivel the bottom peices and slowly turn your structure right side up 
  • Now you are ready for details! I used card stock and my silhouette machine, so its really up to you what you how you want to decorate your TARDIS. You can print a lot of them out and that helps! 
  • Enjoy! It makes a fun background for a photo booth! 


Tuesday, November 19, 2013

Day of the Doctor Giveaway #savetheday


Hello there Whovians! The Day of the Doctor is less than a week away! In the past few days some more footage and shots have come out getting us fans more and more excited. One of the most exciting things I have seen is Tenant wearing a fez. Could this have been where his love of the Fez subconsciously started?


I also can't get over how amazing bad ass this image is of 10 and 11 side by side rocking the sonic screwdrivers. Its the ultimate dream team! No matter what peril the world is in this time it is in good hands because two doctors are better than one! (although there are technically going to be three)


I know I'm not the only one super duper excited! There is an entire universe of Whovian's just as pumped! So to celebrate I am  holding a little giveaway that is open to all of my US friends. The prizes feature some handmade items inspired by my love of Doctor Who. These items include, a TARDIS zipper pouch, 'Home is where the TARDIS is' sign and a blue bow tie (because remember, bow ties are cool)

How do I enter such a might fine contest you might ask? Well just enter a comment telling me what you are most excited about seeing in the Day of the Doctor! This contest runs all week and will end at midnight on the 23. Good Lucky and ALLONSY!


a Rafflecopter giveaway

Saturday, November 16, 2013

Fezzes are cool #savetheday


We are still in full swing of the month of the Doctor! The big shindig is days away! Are you excited?! Have you seen the clip recently released?


If you haven't noticed it features one of the Doctor's most popular accessories... the Fez! Whats more exciting is the two seconds we see Tennant wearing the FEZ! OMG! NERD-GASM! Needless to say it has gotten me quite excited for next Saturday. Speaking of Fezzes... would you like your own ? Perhaps to sport at your own Doctor Who shindig? Well, ALLONSY, let's make one!

Materials & Tools

  • At least 3 pieces of red felt
  • Yellow yarn
  • Scissors 
  • Ruler 
  • Tape measurer
  • Sewing machine and notions

Instructions 

  • Ok first things first, how big is your noggin? Take your tape measurer and wrap it around your head and see what you come up with. My own head is about 20 inches. Add a 1/2 seam allowance!

  • Since felt is cut short, divide your head measurement in half. Then determine how tall you want your fez to be. I made mine 8 inches. Add a 1/2 seam allowance! 

  • Now that you have you measurements, but your pieces! I cut two 10 X 8 inch pieces (dont forget, add 1/2 inch seam allowance!)
  • Lay the cut pieces on top of one another, pin and sew along the edges determining the height of your fez. Congrats you made a tube! 
  • Push your tube out to make a circle and take your ruler and measure from edge to edge. This will be how big you will make the top of your hat. I made mine 6 inches. So measure it out and mark it on felt and cut it out. 

  • Pin the circle to the top of your hat. Sew! 

  • Pull inside out and your almost there! You hat needs tassel before it can be an official fez! 
  • Cut a long piece of yarn and some little tiny bits. Tie the tiny bits to the end of the long piece. This makes the tassels. 


  • Cut two little slits on the top of your hat and tie your tassel to it. 


  • Geronimo! You are ready to go! 

Stay turned later this week for an announcement about my Doctor Who giveaway!


Thursday, November 7, 2013

Doctor Who Bow ties #savetheday


So we all know the obvious… Bow ties are cool!


They are quite easy and fun to make. If you have every wanted to make you own, let me show ya how!

Materials & Tools

  • Red or blue Felt
  • Scissors
  • Hot glue gun
  • Safety pins


Instructions

  • Take the felt and cut out a rectangle. Mine measured 4 X 8 inches
  • Hot glue the top edge and fold down about an 1 inch. Repeat with the opposite side
  • Now for the sides! Hot glue each side and fold to the center of your rectangle
  • Pinch the rectangle at the center and scrunch it up. It will start to look like a bow tie
  • Cut a small rectangle out of felt, 3 x 1 inches
  • Wrap the felt rectangle around the center of the bow tie and hot glue the edges together
  • Once the glue is dried, add a safety pin to the back so that you can wear it


Wednesday, March 20, 2013

Dice Bag


Tim and I have been really having fun playing D & D. We have a rag tag bunch of friends really making it a lot of fun. Tim is taking his role Dungeon Master (DM) seriously and a few days ago he asked if I could make him a bag for his dice. Less than an hour - BOOM! - new dice bag. I was surprised that I figured it out quickly! It came out very snazzy. All of our fellow players were a bit jealous, but I'll probably make them all pouches.

Here is a glimpse of our D & D adventures!


If you also want your own snazzy dice bag just follow this tutorial and you'll have a sweet new dice bag in no time.

Materials & Tools
  • Fabric A (exterior) 
  • Fabric B (lining) 
  • Drawstring (yarn also works) 
  • Ruler 
  • Tailors chalk (or any other tool for marking) 
  • Scissors 
  • Safety pin 
  • Sewing notions 
Instructions


  • Cut the body part of the bag. Take both fabric A and B and cut your size. I made them 5 X 11 inches
  • Cut bottom of the bag. Make a circle out of both fabric A and B. I made my circle have a 3 inch circumference. 

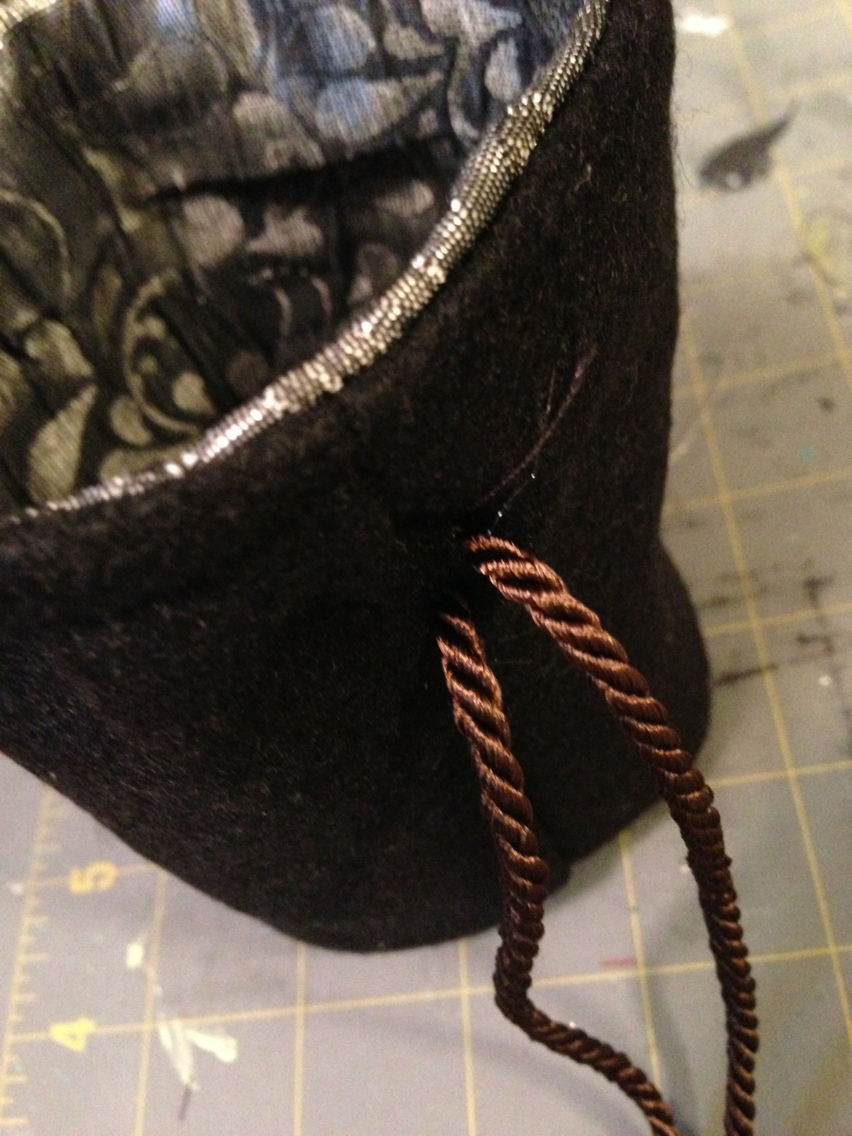
  • Take fabric A and measure in inch from the top make a mark then another mark a half inch from the other mark. Fold your peice in half, pin and sew along the edge (with a 1/4 inch seam allowance). You will leave a hole on the marks you had just made. This is where the drawstring will be fed threw. Just do this step for fabric A!

  • For fabric B and fold in half and sew along the edge (with a 1/4 seam allowance)
  • You made a little tubes, congrats! Now take the circle part, pin and sew to the bottom of your bag for both fabric A and fabric B.
  • Turn fabric A inside out then place it inside fabric B, pin around the edge and sew, but leave a hole about 2 inches. 


  • After sewn up, but the bag inside out through the 2 inch hole. You can press your bag so it looks crisp and nice. 

  • Before you insert the string you need to sew another little line (under the open hole) this will help keep the string in place. So start underneath that open hole and sew around the bag.

  • Now we insert the drawstring! Take a safety pin and attach it to one end of the string and feed it through the hold until it goes around the bag. You can cut and adjust your string as desired. Give it a pull and see how you bag is now a drawsting sack thing! 


  • Ta - da! Be proud you made something fantastical!
 
Related Posts Plugin for WordPress, Blogger...