Showing posts with label gifts. Show all posts

Tuesday, April 29, 2014

Key Chain Wristlet


My pile of scraps have been growing. So I decided to do something about it and I've been doing a few different scrap busting projects. One of them is making a keychain wristlet. They are easy to make and they look great. They are also really durable. When the strap on my clutch wallet broke, I replace it with a wristlet, and its been working out quite nicely.

Here is how you can make your own: 


Materials & Tools: 

  • Scrap fabric 
  • Snap hook 
  • Sewing machine & notions 
  • loop puller 
  • Iron

Instructions 

  1. You will need two pieces of scrap fabric that measure, 2" by 11" (FYI be careful of the fabric you use, you want something nice a durable, but not took thick because you will run into problems later) 
  2. Place the right sides of fabric together, pin and sew along the long edges. Leave a 1/4 inch seam allowance. Congrats, you made a tube!
  3. Use your loop puller and pull your 'tube' inside out. Use your iron to press the 'tube' so it is nice a crisp
  4. Top stitch along the long edges
  5. Insert 'tube' through the snap hook and fold it so that the two short edges are together. Pin and sew along the short edge 
  6. Flip the strap around, so that the other side is exposed. Move the sewn short edge over to the snap hook. 
  7. Pin and top stitch above where the snap hook is. This way you can cover up the raw edge and give your wristlet a nice finished touch.
  8. Put some keys on it and you are good to go! 

Make one yourself! I've been having a lot of fun making all different kinds of wristlets! 


Sunday, December 22, 2013

Craft Night - Christmas Ornaments

 
Life has been a blur lately. I got caught up in Christmas craziness, got sick and there some other crazy stuff going on in life. As a result I forgot to post this about my latest craft night!
In the holiday spirit, we made Christmas ornaments!!! They were simple to make and did require that many materials. I cut out some shapes from old cereal boxes and added some mod podge and some Christmas themed scrapbook paper.
I was glad to see all the folks who came out. Some fabulous ornaments were made and it was all in all a fun time.

 
Even though it is a bit past Christmas, here is how you can make your own ornaments! After all it's only 12 months till next Christmas.

Materials & Tools

  • Cardboard (cereal boxes work great!)
  • Christmas themed scrapbooking paper
  • Ribbon
  • Mod Podge
  • Foam brushes
  • Scissors
  • Hole puncher

Instructions

  • Determine the size and shape of your ornament. I used Picmonkey.com to find some really nice shapes and I formatted them to the size I wanted.
  • Trace your shapes on cardboard and cut them out
  • Go through all of you christmasy paper and figure out what you would like to put on your ornament. Be sure to make them double sided for twice the Christmas magic!
  • Once your design is figured out begin putting them together with Mod Podge. I recommend doing this step in layers alternated between mod podge and paper.
  • After your ornament is assembled, use your hole puncher to make a hole towards the top of your ornament
  • Take some ribbon and tie it around your ornament. Place that baby on the tree!


Thursday, December 5, 2013

A Very Geeky Christmas.....

Hello out there! Its less than three weeks till Christmas. This is a fact that is freaking me out! If you are feeling a little unprepared for the holidays this year I have put together an Etsy treasury full of some of the geeky-ist items for all of the nerds on your list!

Last year I got some of my friends candles from Bubble & Geek and they smelt so good that I debated keeping them for myself! Hopefully this will help give you some holiday ideas!


'A Very Geeky Christmas' by Nerd Craft Librarian 

The holiday season is upon us! Here are some Etsy items to make any pop-culture obsessed nerd in your life quite happy for the holidays!

Star Wars ATAT holiday Christmas greeting card set of 5 - DoodleButton
Star Wars ATAT holiday ...
$12
Super Nintendo Holiday- Geeky Holiday Card- 5x7- Christmas Card- Season's Greetings- Geeky Christmas- Gamer Card - AwkwardAffections
Super Nintendo Holiday-...
$5
And To All A Who Night Doctor Who  Tardis Christmas Card - NinjaGreetingCompany
And To All A Who Night ...
$3.5
Gamer Geek hand decorated shatter resistant ornament D20 inspired Christmas decoration nerdy - ThePerfectCup
Gamer Geek hand decorat...
$12
Christmas Is Coming Dire Wolf Winter Season Parody Christmas Hat Santa Claus Game Joke Nerd Tv Show Geek Funny Holiday T-Shirt Tee Shirt - ClassyWhaleTees
Christmas Is Coming Dir...
$12
Christmas Pinback Button - Geek Nerd Humor - Ho 3 - 3 inch - TheOneStopButtonShop
Christmas Pinback Butto...
$4
BATMAN COMIC Christmas Stocking, Holiday Decor, Superhero JLA Blue White - forbiddenfruit
BATMAN COMIC Christmas ...
$16
Handmade Comic Book Upcycled Paper Decorations, Christmas Ornaments, Geek, Eco - Bookity
Handmade Comic Book Upc...
$25
Gift Tags - Nerd Tags - Pack Of Eight - ableandgame
Gift Tags - Nerd Tags -...
$7
Star Wars Han Solo  Bottle Cap Pendant - GeektasticCreations
Star Wars Han Solo Bot...
$6
Lord of the Rings inspired skirt - map of Middle Earth - made to order - NerdAlertCreations
Lord of the Rings inspi...
$45
Harry Potter Book Movie Title Inspired Potter Geek Head Unisex Pullover Hoodie - parenholly
Harry Potter Book Movie...
$40
I Love You More Than A Zombie Loves Brains - rachaelwindemuller
I Love You More Than A ...
$18
I like big books and I cannot lie quote mug with nerd girl on stack of books - vitaminaeu
I like big books and I ...
$18
PICK 4 - 8 oz Jar Candles from Bubble & Geek - Save on shipping - Video Game, Geeky Candles - bubbleandgeek
PICK 4 - 8 oz Jar Candl...
$38
Luke Skywalker on Tauntaun - Planet Hoth Terrarium / Diorama - Empire Strikes Back - Megatone230
Luke Skywalker on Taunt...
$45

Saturday, December 8, 2012

Mug Shots


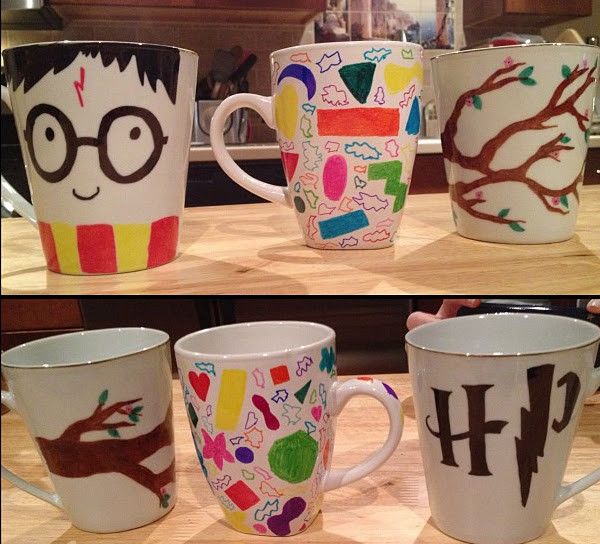
Some of nerdo friends, a few of them came over the other night and we had ourselves a little craft night. It seems that since a lot of people are still in school and the hurricane it has thrown a lot of things off. So after going the whole month of November with out a craft night, I called Michele and said 'girl we gotta meet up.' I had the idea of making possible Christmas gifts, because you know...tis the season.

Michele perfecting mugtastic-ness
I got some pin-spiration which led me to the blog, The Sweetest Occasion. It had great instructions and I decided that I needed to try it. I stopped at the Dollar Tree (guys this is my new favorite place!)
So we sat in my craft dungeon, waiting for some idea to come to us. We were on our iPhones waiting for inspiration to hit when I mentioned possibly doing something Harry Potter related like a snitch or a lightening bolt. Morgan suggested that I make his face. I really like the idea of drinking coffee out of Harry Potter's head, so I went for it! Morgan sketched out some tree branches while Michele went for some funky ass shapes. It was fun making them and just chatting with the gals. After we were done we baked those bad boys in the oven. Here are the results!


The next morning I made use of Potter mug. It made coffee taste all the more magical! I also plan on making another trip to the dollar store and stocking up on more mugs because I think these are going to be everyones christmas presents this year (to those that read the blog, act surprised!) I'll even get some hot cocoa or K-Cups and stick in the little muggles (get it? Potter humor) 


If you want to make your own here is what I did to make them. I followed the instructions from this blog I mentioned earlier (the Sweetest Occasion)


Materials & Tools

  • White ceramic mug
  • An array of sharpie markers 
  • Oven 
Instructions

  • Clean those mugs good! I used soap, water and a bit of windex 
  • Think of something super neato to put on your mug
  • Start drawing your design. Its ok if you make a mistake! Break out that windex and wipe away the oops.
  • Now you can bake 'em! DO NOT PRE-HEAT! The ceramic is very sensitive to temperature. So stick them in the over THEN turn the over to 350 * 
  • Set a timer for 30 minutes. After the timer is done, turn the oven off let' the mugs cool.
  • Then enjoy! 
  • F.Y.I. best not to put them in the dishwasher or microwave
Related Posts Plugin for WordPress, Blogger...