

Showing posts with label sharpie. Show all posts
Showing posts with label sharpie. Show all posts
Tuesday, February 12, 2013
Iron Craft Challenge # 3 - Hearts & Stars
Another Iron Craft Challenge is in the bag! This time around the challenge was hearts and flowers. So Michele and I took a trip to the dollar store and decided to decorate some fancy plates. We used the same technique for the sharpie mugs. Here is what I ended up with!!!!!


Thursday, December 13, 2012
Countdown to Christmas!!!!
This year the Christmas season has been pretty easy going. I think thats because it is my first year not having to worry about finals... I get to actually enjoy the season! I have even had some time to catch up on some craft projects!


I made this main organizer because I am getting really tired of huge mail piles. I bought burlap fabric with vintage skeleton keys at Joann's. I didn't have a project in mind for it but I just really wanted it so boom, impulse buy. I put this together on a canvas we had laying around and viola! It came out pretty snazzy looking. I am in the midst of creating a tutorial for it, so look out for that soon!

I have also been trying new types of crafts at work. Recently I did a craft with youngin's (ages 2 - 3) we used shaving cream and food coloring to make a really neat marble effect when mixed on a paper plate. You then lay a piece of paper flat on top, then wipe away the shaving cream. I had some wintery type shapes for them to slap on it. I called it snowscapes. It wasn't as messy as I thought. Here is how my sample came out.


Getting back to Christmas fun time! I was excited to get my latest Whimsey box that was chock full of gift wrapping items! I also got a bunch of ribbon from my mother in law, which has been going to good use. I have been using brown packing paper to create my own wrapping paper. I have those sharpies left over form my mug craft and used those to make some fun whimsical wrapping paper. I think I got the wrapping thing down this year and proud of my skills! Here are the presents under our tree so far.

I mentioned the mugs earlier and I got a bunch more for some customized christmas presents. I am working on a mustache for my friend fond of facial hair, Margaret and one for my sea cow loving friend Laura. I hope she will enjoy some mana-tea with it!
Also don't forget about my friend Michele and her epic giveaway for the entire month of December! Go check it out at Short Girl, Long Island

Saturday, December 8, 2012
Mug Shots

Some of nerdo friends, a few of them came over the other night and we had ourselves a little craft night. It seems that since a lot of people are still in school and the hurricane it has thrown a lot of things off. So after going the whole month of November with out a craft night, I called Michele and said 'girl we gotta meet up.' I had the idea of making possible Christmas gifts, because you know...tis the season.
.JPG) |
| Michele perfecting mugtastic-ness |
So we sat in my craft dungeon, waiting for some idea to come to us. We were on our iPhones waiting for inspiration to hit when I mentioned possibly doing something Harry Potter related like a snitch or a lightening bolt. Morgan suggested that I make his face. I really like the idea of drinking coffee out of Harry Potter's head, so I went for it! Morgan sketched out some tree branches while Michele went for some funky ass shapes. It was fun making them and just chatting with the gals. After we were done we baked those bad boys in the oven. Here are the results!
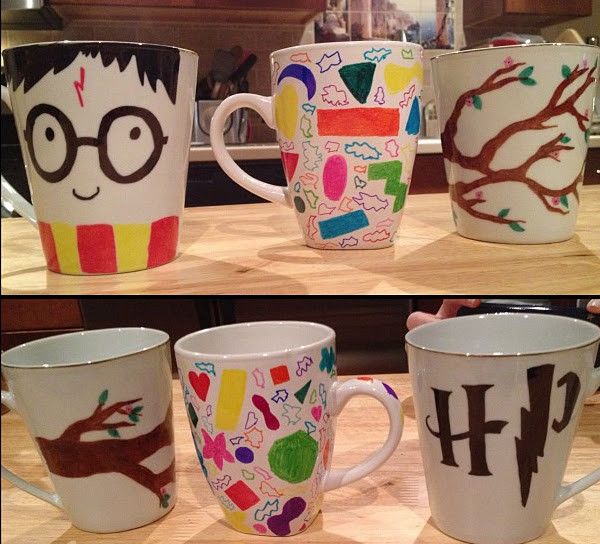
The next morning I made use of Potter mug. It made coffee taste all the more magical! I also plan on making another trip to the dollar store and stocking up on more mugs because I think these are going to be everyones christmas presents this year (to those that read the blog, act surprised!) I'll even get some hot cocoa or K-Cups and stick in the little muggles (get it? Potter humor)

If you want to make your own here is what I did to make them. I followed the instructions from this blog I mentioned earlier (the Sweetest Occasion)
Materials & Tools
Materials & Tools
- White ceramic mug
- An array of sharpie markers
- Oven
- Clean those mugs good! I used soap, water and a bit of windex
- Think of something super neato to put on your mug
- Start drawing your design. Its ok if you make a mistake! Break out that windex and wipe away the oops.
- Now you can bake 'em! DO NOT PRE-HEAT! The ceramic is very sensitive to temperature. So stick them in the over THEN turn the over to 350 *
- Set a timer for 30 minutes. After the timer is done, turn the oven off let' the mugs cool.
- Then enjoy!
- F.Y.I. best not to put them in the dishwasher or microwave
Subscribe to:
Posts (Atom)
