Showing posts with label dIY. Show all posts

Tuesday, May 6, 2014

Pointillism Vase


Iron Craft Challenge # 9 is 'Inspired by Art' So it got me thinking of some of my favorite art pieces. One of them is featured in Ferris Bueler's Day Off and Cameron has a serious stare down with a Surrat painting. Its one of my favorite scenes in movie history! 


This painting uses the pointillism technique so I used that as my jumping off point for this project. It involves using a series of dots of varying colors to create a pattern in which an image emerges. Since I wasn't setting out to make a grand masterpiece I applied the idea to a small scale project, a small vase. I used an ampersand design (&) because they are just so neat and visually interesting. After my little vase was done I put some rocks in it and suck a candle in there. 

Here is how you can make one yourself: 

Materials & Tools
  • Glass jar or vase 
  • Contact Paper Stencil 
  • Q-tips 
  • Paint (varying colors)


Instructions: 

  1. Clean your jar/vase with some glass cleaner and dry it to remove any dust. 
  2. Apply your stencil to the jar/vase and press out the air bubbles as best you can.
  3. Take a q-tip and dip it in some paint and start dabbing your jar/vase over the stencil. Continue this step with different colors, until you like your color combination. 
  4. Allow to dry for at least 20 minutes. 
  5. Gently peel off stencil to reveal your wonderful design! 


Thursday, May 1, 2014

Crayon candles - Library Life

March is national craft month. So I thought be appropriate we do some serious crafting with the teens!


While looking for ideas I came across this project on Brit Co, using crayons to make candles!!! I've always wanted to do a candle making project but it always looks too complicated and dangerous in a group setting. This one however utilizes soy candle wax and a microwave. candle making made easy!


I gathered all of the supplies and we got to work! Go to Brit Co for the full tutorial, but here are some tips that I picked up while adapting this project for a group.

Crayon Candle Tips:

  • Use Crayola crayons. There is some sort of special wax only in Crayola crayons that makes them melt. I tried with other types of crayons and it just doesn't work. Crayola only! 
  • Waiting for each layer. I didn't realize that each layer needed to try before pouring on the next one. So while we waited for each layer, we played a few rounds of Apples to Apples. 
  • Depending on how big your microwave is, you can melt up to four cups in the microwave all at once! That will help if you have a fun program of kids.
  • Be wary of the wicks! The wicks can get a little wobbly, so when pouring in the wax, make sure your keep it straight standing up! Mine shifted to the side and looks weird. 


Tuesday, April 22, 2014

Iron Craft Challenge 8 - Spring has Sprung - Teired planter

Spring is finally here!!!! This means I can start sprucing up the outside of the house. The front of our house needs a serious pop of color. It is very white. I thought a painted planter would help! 

This planter project also meets the requirements of the latest Iron Craft Challenge # 8 - Spring has Sprung! The task for this challenge was to make something inspired by spring or Easter. 


Since big planters can be kind of pricey, I thought about making a tiered planter. Since terra cotta planters are inexpensive, I bought three of varying sizes. I took them home and spray painted them with some color. I painted the top rim gold and the bottom a dark green. After I put it together I realized it looks like a Zelda inspired planter which was no my intention. 


After painting, I began to layer them together with soil and plastic planter turned upside down. That way you don't have a ridiculous amount of soil. After putting it all together it didn't seem very sturdy. I was worried about the wind blowing it over. So I had a dowel in the garage and was able to use that to keep it all together. 

It came out pretty fantastic! Now I just need to put some flowers in it! 


Tuesday, April 15, 2014

Iron Craft - Trends (Nautical Planter)


We have gotten a few little Spring teases. Its gotten warm, then the next day is freezing. The weather may not be agreeable, but I am ready for Spring! I decided if I can't make it happen out side, I'll bring a little bit of spring inside! So I decided to add some houseplants to our decor. I came across these planters at the Dollar Tree and thought I'd decorate them.


This also went along with an Iron Craft Challenge, Trends. Crafters were able to do a project inspired by some of the latest trends, which included floral, geometric or one of my favorites, nautical.

When you live on an island, a lot of people adopt the nautical theme in their houses. I like the motif but some people cover their houses in sea shells with clever signs that say "Life is a Beach" I prefer a more subtle approach to the nautical look. I'm really drawn to nautical stars and compasses. I don't know why but they are just so cool and look old-timey.


So I decided to add some nautical flair to my planter! And it came out pretty snazzy! Here is how I made my nautical planter.

Materials & Tools


Instructions

  • I used pickmonkey and used their nautical star overlay
  • I printed it out and traced it onto some contact paper and cut it out with the exacto knife 
  • I then took my planter and made sure it was nice and clean, then I positioned it on my planter
  • Next it was painting time! I used Martha Stewart's Gunmetal paint 
  • I gave it a coat or two and let it dry 
  • After I let it dry for a bit I peeled off the contact paper to reveal the design


Monday, March 10, 2014

Iron Craft # 5 - A is for ....


So I've take a bit of a break from the last few Iron Crafts, but I am back! 

This time around the challenge was called, 'A is for...' Crafters were given to task to do something either inspired by the alphabet or something that begins with the letter A. One thing I love about these Iron Craft Challenges is that they are open to interpretation. So I went with A is for applique! 


I recently got the fabric blade for my silhouette machine. I was excited to be able to put it to good use! It was incredibly easy to use and the results are pretty amazing. 

This challenge was coincided with distaste for my couches throw pillows. I was sick of them so I decided to make a few new ones. I wanted to make one featuring my two favorite dopes, Gyspy and Bmo. I also made one featuring a stag head, I just think its an image that looks cool. 


I still have two more pillows to replace. I've got a few ideas of what I can do, I'll be sure to tell you all about it. 


Wednesday, February 12, 2014

Entryway Makeover

Since we had some time on our hands and some Home Depot giftcards we got around to doing a house project!

We have a little entry way cove area that was pretty boring. There is a closet there, however we never use it! A few times when I have hung guests jackets, they have been forgotten. The closet is good for storage, but when it comes to hanging up coats we needed something easier.


It was fairy easy, paint a board of wood and attach some hooks. To spiff it up a bit, Tim asked if I could do some sort of distressed technique to the wood board and I white washed it. We had it finished right before our Super Bowl party and it was a good test, because we were able to fit a lot of coats on that thing!

Before we built the coat rack, we had to give this area a splash of color. Since it was a small area we were able to paint it pretty quickly. It took more time to tape up around the moldings!


The space above the coat rack needed something. I had a left over canvas and thought an image of Long Island was appropriate. Its a bit off center and there is a blank space because Tim is going to make a little something. Eventually.


Sunday, January 26, 2014

Decorative Plates


I've gotten really sick of stark bare walls and I've been trying a few different things to really liven up our dinning room. I found this mirror for 20$ at Marshall's (score!). It was a little cracked and boring white. So I gave it a goat of gray to really spiff it up. I hung it opposite some windows. That is a design trick that is supposed to make the room feel bigger. I have our Parisian street art pictures hanging on another wall, along with a little flying birdie my friend Margaret got me. However that still left some blank spots in the room. What to do?


Originally I had planned to start collecting graphic plates and hanging them on the wall. That hit a snag when I did not like anything I was finding, either in the design or price. So I decided to put my own DIY spin on it and made some plates of my own! I abandoned my plan of an entire wall of plates and decided to hang them on each end of the windows. It makes it look balanced and we now have plenty of visual interest in this room!


Materials & Tools

  • White glass plate 
  • Spray paint (two contrasting colors) 
  • Contact paper 
  • Exacto Knife 
  • Plate hanger 

Instructions 

  • I recommend purchasing plates from the Dollar Tree because they come in different shapes and sizes and they are only a dollar so if you make a mistake its not a big deal. 
  • Plan out a design, make it simple and not too intricate. Trace and cut out the design on contact paper (or if you have a silhouette machine just use that) 
  • In a well ventilated area, spray paint a base coat. (this should be the color you want your actual design to be) Allow design to dry. I recommend letting it sit over night.
  • Peel out your design and stick it on the plate
  • Spray a top coat of a contrasting coloring and allow to dry. (don't wait too long because you run the risk of peeling off the paint from your design) 
  • Allow the paint to dry for at least a day before you hang it up. (otherwise your house is going to smell like paint fumes) 


Linking up with: 


Sunday, December 22, 2013

Craft Night - Christmas Ornaments

 
Life has been a blur lately. I got caught up in Christmas craziness, got sick and there some other crazy stuff going on in life. As a result I forgot to post this about my latest craft night!
In the holiday spirit, we made Christmas ornaments!!! They were simple to make and did require that many materials. I cut out some shapes from old cereal boxes and added some mod podge and some Christmas themed scrapbook paper.
I was glad to see all the folks who came out. Some fabulous ornaments were made and it was all in all a fun time.

 
Even though it is a bit past Christmas, here is how you can make your own ornaments! After all it's only 12 months till next Christmas.

Materials & Tools

  • Cardboard (cereal boxes work great!)
  • Christmas themed scrapbooking paper
  • Ribbon
  • Mod Podge
  • Foam brushes
  • Scissors
  • Hole puncher

Instructions

  • Determine the size and shape of your ornament. I used Picmonkey.com to find some really nice shapes and I formatted them to the size I wanted.
  • Trace your shapes on cardboard and cut them out
  • Go through all of you christmasy paper and figure out what you would like to put on your ornament. Be sure to make them double sided for twice the Christmas magic!
  • Once your design is figured out begin putting them together with Mod Podge. I recommend doing this step in layers alternated between mod podge and paper.
  • After your ornament is assembled, use your hole puncher to make a hole towards the top of your ornament
  • Take some ribbon and tie it around your ornament. Place that baby on the tree!


Thursday, November 7, 2013

Doctor Who Bow ties #savetheday


So we all know the obvious… Bow ties are cool!


They are quite easy and fun to make. If you have every wanted to make you own, let me show ya how!

Materials & Tools

  • Red or blue Felt
  • Scissors
  • Hot glue gun
  • Safety pins


Instructions

  • Take the felt and cut out a rectangle. Mine measured 4 X 8 inches
  • Hot glue the top edge and fold down about an 1 inch. Repeat with the opposite side
  • Now for the sides! Hot glue each side and fold to the center of your rectangle
  • Pinch the rectangle at the center and scrunch it up. It will start to look like a bow tie
  • Cut a small rectangle out of felt, 3 x 1 inches
  • Wrap the felt rectangle around the center of the bow tie and hot glue the edges together
  • Once the glue is dried, add a safety pin to the back so that you can wear it


Wednesday, October 2, 2013

Halloween Wall Art

Hello Girls and ghouls! I'm happy that it is finally October! Its the month of birthdays (Tim and mine have birthdays two weeks apart) and its also the month of spooktacular fun! Last year I posted a few different Halloween themed tutorials including Halloween potion bottles and burlap bunting.  This year is no different! I'll have a different tutorial each week to help get you in the spooky spirit.


We're starting off with an easy one! Halloween Wall Art! They are easy and fun. I had a lot of fun looking up funky old timey clip art! Here is what I did to make my wall art here is how you can to:

Materials and Supplies:


  • Picture Frame (I went with 8 x 11 from the Dollar Tree) 
  • Sand paper 
  • Spray paint 
  • Halloween clip art


Instructions


  • Open up the picture frame and carefully remove the glass and put it in a safe place. 
  • Use your sand paper and rough it around the edges of the picture frame. (this will help the spray paint adhere to the frame) When you are done make sure to wipe away any saw dust. 
  • Use some white paint and do a base coat. Allow to dry.
  • Pick out some holloween-ish colors and start spraying it down. Allow to dry 
  • Now the fun part, find your art work! The Graphics Fairy lives up to her name and is quite amazing. 
  • Once your frame has dried, put together the frame and insert glass and your pictures. Now you are read to decorate your house! 


Tuesday, September 3, 2013

Dry Erase wall calendar


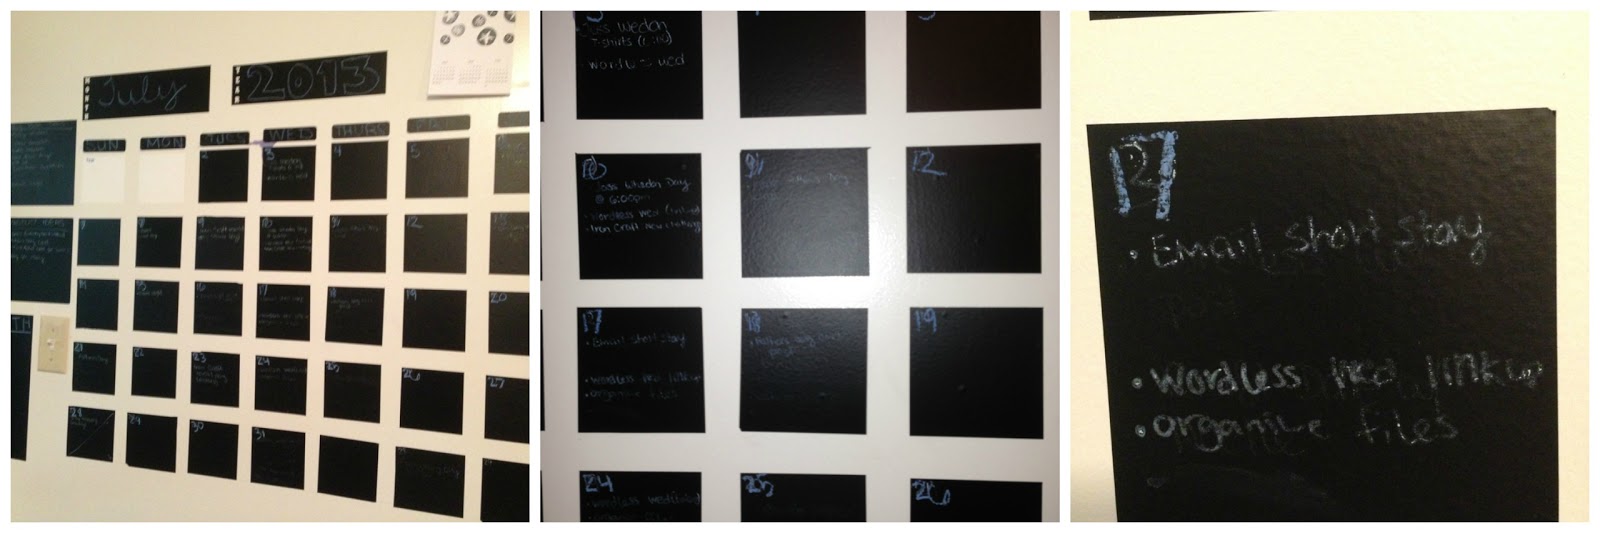
At certain times of the year I'm quite the busy gal. I have a bunch of task managers to help keep me on track. In the craft room I wanted to make something helpful to keep track of projects I'm working on and blog posts to publish. I used to have a calendar where I would just put up post-it notes of all of the different things I have to get done. After a cold winter in there and the addition of a much needed space heater, post-it notes became a bit of a hazard. So I was stuck, what was I to do?

As you can see, the white chalk paint would not erase.
I used some black contact paper to make a chalk board calendar. I set up a grid and started organizing my tasks. However, I ran into a few issues. I couldn't write things in detail because of how chalk is. So I used a chalk ink pen instead. It worked great for my first month, but when I went to clear the calendar for the next month, the chalk ink was not going quietly. Again I was stuck! At the time I had recently purchased some white contact paper and I had another idea. I took some dry erase markers and did an experiment, and to my surprise it worked just like a dry erase board. So I set about making my calendar yet again. This time around It's been up for a couple of months and it has been working perfectly! When it comes time to wipe away for the next month, I just need a wet paper towel (magic erasers also work like a charm)


Since it's back to School time this project is perfect to help you get into the swing of things! Here is how you can make your own calendar

Materials & Tools


Instructions
  • In order to determine your calendar dimensions make sure you have a good spot picked out. A big empty wall works best. Keep in mind that you will be making 7 columns (one for each day of the week) with 5 rows (for each week of the month) 
    • Here are the dimensions I used: 
      • Day squares 4 X 4 inches
      • Days of the Week rectangles 4 x 2 inches
  • Once your size has been determined, roll out some contact paper and start tracing our your day squares. You will need 35. Also measure out days of the week rectangles, you will need seven. 
    • Tip: Most contact paper has a grid on the back of it, which will help white measuring and marking out all of the shapes.
  • After all of the squares and rectangles have been traced start cutting them out. You can use scissors or lay down a ruler and go over the trace marks with an exacto knife. 
  • Go to the wall you are putting the calendar, and give it a little clean. Use a ruler to make the measurements of where the calendar will be placed. If you want to make sure the calendar is perfect, then use masking tape to create a grid. 
  • Now you are ready to create your calendar! Peel and stick all of the peices to the wall. Remember you are making 7 columns across and 5 rows down. 
  • If you get any air bubbles use a piece of card board to push them out. 
  • Use your dry erase markers and start setting up your calendar and plugging in important dates and tasks 
  • When you are ready to erase the calendar use a damp cloth or a magic eraser. 


Sunday, June 9, 2013

June is here!

Hey guys! Summer is just about here! Wooo!!! I can't believe that its been a year since I graduated and this time last year I was a Parisian princess. This time around I've been getting ready for impending summer doom at work, finally doing some house projects and having some fun. Here is a little recap of what I have been up to lately.

House stuff....

So I've taken a bit of a sewing break and have been concentrating my crafty efforts on beautifying this house of mine. I started with adding some flair to some plain candle holders I got from the dollar store a while back. I made a stencil with my silhouette machine on contact paper than gave it a good spray with some frosted glass. They came out pretty snazzy!


I also used some canvases and made some snazzy wall art. My entry way was really blank and I needed to put something there. After all its the first impression visitors get! Again I used the silhouette to make stencils and sprayed them down with a coat of paint.


Also adding to our decor is this awesome Game of Thrones poster! Tim has been determined to snag a really cool mondo poster since we moved in. He set up his phone to get a notification when new designs were announced (because they sell out really fast) after a few fails, this was such an epic win! Its bran and his dire wolf, Summer. The wolf bears some resemblance to my pup Gyppers, don't ya think?


my own dirt digging dire wolf


Speaking of Game of Thrones, :::WARNING SPOILERS::: I was so devastated by last week's episode. Billy called me right after and it felt like someone non-fictional died. We were like "yeah I just saw them, they were gonna save Westeros and teach Joffery a lesson." I had trouble sleeping that night. What really freaked me out was seeing Rob Stark's pregnant wife get stabbed in the stomach so violently. It was also a big huge lesson, ALWAYS LISTEN TO YOUR MOM (I'm looking at you Rob Stark! way to screw it up for the North!) I'm reading the book, Storm of Swords, at the same time so its interesting watching the show along with it.


Aside from house stuff, although I say sewing break, I have gotten some in. After getting a few extra Etsy sales I decided to treat myself to my very first Spoonflower purchase! I made some purdy headbands with this TARDIS print and I couldn't resist getting this Doctor doll! I got number 10 but I was excited to see the same designer also has a #11, so I will be making another purchase soon! (Side note - I'm really devastated that Matt Smith has announced his departure)


Last Saturday I hung out with Caitie. We did serious wedding talk and were planning out her invites! After an afternoon of craft, we met up with Joe, Laura and Peter and went to the Brookhaven Fair. I haven't gone to it in years because its usually a rip off, carny folk are cantankerous and those rides are creepily unstable. However we had a lot of fun. We splurged and bought the unlimited rides wrist band,  we were all gung ho about getting our money's worth and going on as many rides as possible! We went on swings that went really high up and Caitie freaked out, it was awesome. Then later all of the spiny rides took their toll on Tim and he decided to go wait in the car and sleep. Caitie and I just needed to go on a few more rides, including the haunted mansion!!!! The scariest part was a carny guy walking around on his cell phone that bumped into us on accident. I didn't expect it and it scared the crap out of me.


Related Posts Plugin for WordPress, Blogger...